 Login
LoginWatchman Sonic Installation Guide
Have you recently purchased a Watchman Sonic and unsure how to install it onto your oil tank?
If you’ve recently purchased a Watchman Sonic and are looking for guidance on how to set it up, you’re in the right place. These straightforward, step-by-step Watchman Sonic instructions from the Watchman oil monitor manual will ensure you’ve installed everything correctly on your oil tank, so you can keep track of your oil fuel levels without the need to check the tank manually.
The Watchman Sonic is an electronic oil level monitor designed to measure the amount of fuel in your tank and relay that information wirelessly to a receiver inside your home. Its ultrasonic technology ensures precise readings, and the wireless connection means you don’t have to deal with complicated wiring or frequent outdoor checks. This device gives you peace of mind by providing accurate, real-time updates on your oil levels, so you can plan your fuel purchases effectively and avoid running out unexpectedly. This page includes details from the Watchman Sonic manual to help you get started with confidence.
How do I install the Watchman Sonic?
To ensure a quick and easy installation of the Watchman Sonic, please follow the below steps.
Step 1 – Checking tank’s level, distance from receiver and Height of tank.
There a few things to consider, even before you start to install your Watchman Sonic onto your tank.
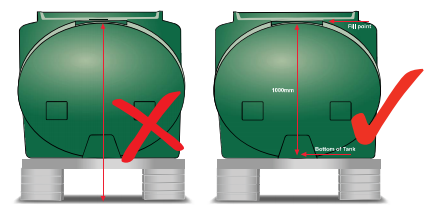
- Is the tank on a flat, level Surface
- Is the tank within 200 meters range from the receiver position
- Not including the base, is the maximum height of the tank 3 meters? If larger than this, please contact us.

Step 2 – Preparing your tank
Below are a few steps for making sure your tank is ready for the Watchman Sonic, whether you have a Pr-Drilled tank or one which is undrilled, we have a step for you.
Please note that it is important for all items to be kept dry during the installation process, to achieve the best outcome.
Pre-Drilled Tanks
With most pre-drilled tanks, there will already be a 32 mm opening on the top of the tank, with possibly a tube fitted. If so, remove the cover by undoing the 2 screws holding it in place. Dispose of the tube which was fitted, in accordance with your local government guidelines.
Please check the pre-drilled hole is a minimum of 30 mm in diameter.
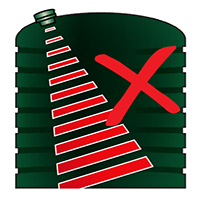
The space beneath the Watchman Sonic needs to be free of any obstacles, so please check that the ultrasonic beam path is clear of any obstructions. If not, this could send back false readings.

Un-Drilled Tanks
When choosing the correct position on your tank to drill the hole required, consider choosing a flat level point that is the same level and no higher than any opening at the top of the tank. Like the filling point etc.
If the transmitter is fixed at an angle, it will give an incorrect level reading on the receiver, so the straighter, the better.
Step 3 – Fitting the Transmitter
If your tank comes with a pre-drilled hole, please follow the next step to help fit the transmitter base to your tank.
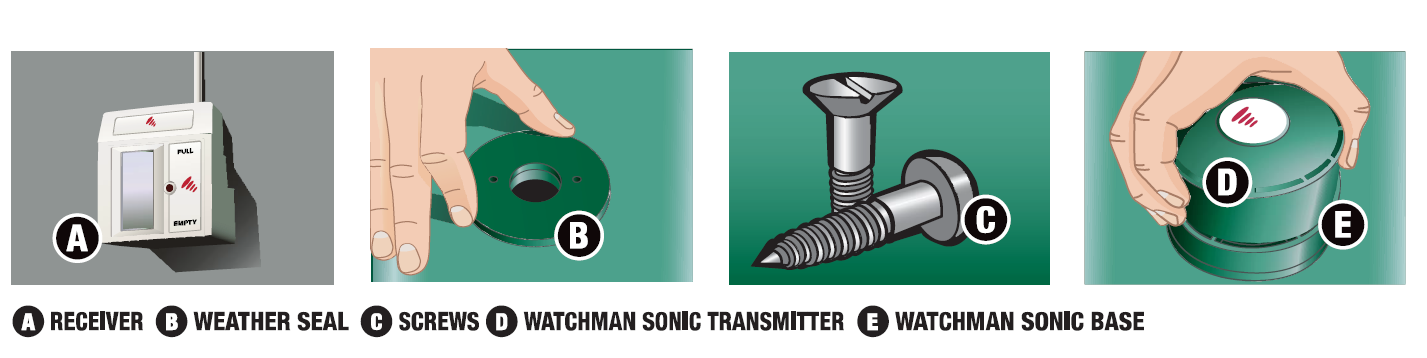
- Remove the cap from the hole and insert the transmitter base (part B), ensuring the weather seal is securely in place

- Tighten the Watchman base on to the tank with 2 stainless steel self-tapping, counter sunk screws supplied (part C). Please be careful not to over tighten the screws.
Step 4 – Measure the height of the tank
To accurately measure the height of your oil tank, measure from the base of the tank (not including the base/piers the tank is positioned on) to the position of the Watchman Sonic (should be the same as the fill point). For the Watchman Sonic to work, the maximum height is 3 meters for the measurement above.
Step 5 – Setting the Switches on the receiver
Within your product packaging, use the Tank height chart, read across to the relevant multi switch setting, using the tank measurements you took in step 4. For example, if your measurement was 100cms, then the switches to flick up would be Switch 5 and switch 7.
To flick the switch upwards, using a screwdriver or top of ballpoint pen to set the relevant switches. These switches can be found on the back of the receiver above the plug (as in the position displayed below)

Switches 1 & 2 are factory set switches and have no relevance to the end user. If you wish to set a audible ring feature, then switch one needs to be moved up. This will cause the the unit to bleep in the event of a low level reading.
Step 6 – Linking Receiver and Transmitter
To pair the receiver (part A) to the transmitter (part D) so that the system code is unique to your tank set up, you will need to do the following, and it should only need to be done once -
- Plug the receiver into a suitable and convenient electrical socket.
- Switch on
- The display screen on the front of the receiver will show a flashing bar. This will indicate that the receiver is waiting for the code required. The bar will continue to flash for up to 2 minutes, during which time, you should be able to pair the transmitter to the receiver.
- Hold the transmitter against the receiver's right-hand side, so that the white dot on the transmitter is touching the black dot on the receiver for roughly 20 seconds, to allow the unique code to be transferred. This is IMPORTANT to help with the pairing.

- Bars will start to increase up the display screen and a clicking sound should be audible. When all 10 bars are visible and flashing, this will indicate that the unique code has been transferred.
- Once matched, attached the transmitted immediately to the position on the tank.
- If you are installing more than one Watchman Sonic unit, please wait 9 minutes before matching the other units.
Step 7 – Attaching the Transmitter to the base
Once paired, screw the transmitter (part D) into the base (part E), ensuring the transmitter is vertical on top of the tank and level.
Please match sure that the threads have not crossed, so when screwed in correctly it should give a secure seal.
Step 8 - Checking the level of oil within the tank

The bars on the visible screen of the receiver indicates the level of oil that is within your tank.
Please note that it can take up to 2 hours until the first accurate reading is displayed on the Watchman Sonic.
Congratulations your Watchman Sonic should now be successfully installed.
If you require any further technical information, or if your Watchman Sonic is not working as it should, please contact warranty@sensor-systems.com.